Monday, August 29, 2011

Buttery Biscuits... only 4 ingredients needed!

Easy, Easy, Easy, Easy and very buttery and delicious! These are the melt in your mouth kind of biscuits...

{{Buttery Biscuits}}


1/2 cup sour cream

1/2 cup 7-up

1/4 cup melted butter


Preheat oven to 450 degrees.


Cut sour cream into biscuit mix using a pastry blender, or two forks.


Add 7-Up. Makes a very soft dough.


Sprinkle additional biscuit mix on board or table and pat dough out. Using a circle biscuit cutter, cut the biscuits.


Melt 1/4 cup butter in a 9 inch square pan in the preheated oven. Place cut biscuits in pan and bake for about 15 minutes or until golden brown.


**Short-cut... Instead of rolling out and cutting biscuits, just drop biscuit dough into the buttered pan and bake. Voila... done! See... what did I tell you... easy, easy, easy, easy!


This is what the dough looked like after mixing the ingredients together.


And here is their golden goodness after they have baked in the hot oven! Mmmmm... Mmmmm... Mmmmmm....
Serve with butter, jelly, or with gravy.... so many possibilities.

Sunday, August 28, 2011

Church Quiet Book... ready in 5 minutes!

This was a quick and easy quiet book that I made in about 5 minutes.....

I actually made it right before church.... Using 4 simple items...

1- plastic badge holders (this particular set was purchased at Office Max, 10 for $4.99, but you can buy them cheaper at Wal-mart for around $1.69, however the plastic is lighter-weight).

2- Circle Binder Clips (Purchased a variety pack of 8 silver rings at Target for around $2)

3- Ribbon... any size, color, texture, etc.

4- Pictures (I used a variety pack of pictures that measured 3x4 inches)

I inserted the picture into the badge holder (the picture was the exact size of the badge holder and since there was a saying on the back, I didn't mount the picture or add any embellishments. I simply slipped the picture in).

Next I put the pictures onto the binder ring and closed it.

I tied on a bunch of ribbons to embellish the quiet book and VOILA!!! It was done!

Quick... easy... and the kids enjoyed looking at the pictures and the older kids enjoyed reading the sayings.

5 minutes... done!

Friday, August 26, 2011

Frozen Butterbeer Drink

Harry Potter... we love Harry Potter! The last movie just came out and while we haven't seen it yet, we are excited to have the chance.

To celebrate... I found some recipes for Butterbeer, that delicious drink they always drink in the book. When they created "The Wizarding World of Harry Potter" in Universal Studios, I was ready to go as soon as it opened. I was so bummed when I found out it was in Florida and not California. If it had been over in Hollywood, I would have been there either on opening day or soon thereafter, but being that it is in Orlando created a bit more of a problem. Oh well... I will go one of these days.

I've heard that at the amusement park they serve Butterbeer... Mmmmm.. Two kinds of Butterbeer... one frozen, and the other not frozen. I found two recipes, modified them a bit so they are non-alcoholic and we tried them both.

Here is the first recipe... It is a warmer version of butterbeer....


{{Warm Butterbeer}}


(printer friendly version)

It warms you up and tastes great! From the Three Broomsticks!

1 cup (8 oz) cream soda (or club soda)
1/2 cup (4 oz) butterscotch syrup (ice cream topping)
1/2 tablespoon butter

Step 1: Measure butterscotch and butter into a 2 cup (16 oz) glass. Microwave on high for 60 to 90 seconds, or until syrup is bubbly and butter is completely incorporated.

Step 2: Stir and cool for 30 seconds, then slowly mix in cream soda. Mixture will fizz quite a bit.

Step 3: Serve in two mugs or small glasses.

A Perfectly Warm Hogwarts Treat for Two!


Here's the second recipe.... The Frozen Butterbeer recipe... this was by far our favorite. We liked this one the best! So if you are only going to try one... try this one first!


{{Frozen Butterbeer}}

(printer friendly version)

For the Butterbeer:
1 1/2 cups cream soda (we used IBC cream soda)
6 tablespoons butterscotch syrup (ice cream topping)
2 cups ice

For the foamy topping:
6 tablespoons heavy cream
1 tablespoon powdered sugar
1 tablespoon butterscotch syrup
1/2 teaspoon vanilla extract

Combine cream soda, syrup, and ice in a blender and blend until it is slushy.

Pour into a glass or mug.

In a small bowl, combine heavy cream, powdered sugar, syrup and vanilla. Using an electric mixer, whisk together until almost whipped. You want the cream mixture to be slightly loose, not as stiff as whipped cream. Top the frozen Butterbeer with the foamy topping and serve immediately.

Serves 2.

Possible change for our second attempt at this... (but it will require more planning to make it). I think if we freeze the cream soda in ice cube trays and then replace them with the regular ice cubes, it will help the drink from becoming watered down as it melts in the mug.

If you don't let it sit in your glass for very long, then this won't be an issue, but extra flavor is always a plus!


Brownie Cookies


The yummi-ness of a brownie, in the convenience of a cookie. Less mess! More joy! Brownies are a favorite dessert of mine... their chewy, chocolatey-ness is amazing!


{{Brownie Cookies}}

(printer friendly version)


1/2 cup butter
4 (1 oz) squares unsweetened chocolate, chopped
3 cups (18 ounces) semisweet chocolate chips, divided
1 1/2 cups all purpose flour
1/2 teaspoon baking powder
1/2 teaspoon salt
4 large eggs
1 1/2 cups sugar
2 teaspoons vanilla extract

Combine butter, unsweetened chocolate, and 1 1/2 cups chocolate chips in a heavy saucepan. Cook over low heat, stirring constantly, until butter and chocolate melt; let cool.

Combine flour, baking powder and salt in a small bowl, set aside.

Beat eggs, sugar and vanilla at medium speed with an electric mixer. Gradually add dry ingredients to egg mixture, beating well. Then add the chocolate mixture and beat well. Stir in remaining 1 1/2 cups chocolate chips.

Cover a baking sheet with foil and then scoop dough onto the baking sheet using an ice cream scoop. Place dough about 1 inch apart. Bake at 350 degrees for 10 minutes. Cool slightly on baking sheets; remove to wire racks to cool completely.

Makes about 4 1/2 dozen cookies.


After you mix up the batter, and scoop it onto the cookie sheet it will look like this.....

The first batch I made, I put them directly on the cookie sheet and they seemed to stick a little bit and it was difficult to get them off. So I covered the baking sheet with a variety of products to see if I could find a good way to remove the cookies more easily. I used parchment paper and aluminum foil. I think the foil worked the best (not pictured) but definitely makes for easier removable and cleanup after you bake the cookies.

This is what the cookies look like right after they come out of the oven. They are puffy and looking ready to eat... but beware- they are HOT and gooey and VERY messy. I only know this, because I did try one at this stage. You definitely need to get a glass of milk ready to drink if you are going to attempt to try them at this point. Better to let them sit on the cookie sheet for a few minutes to cool off.

After they have rested and cooled, they will flatten out and look like this:Then you can remove them from the cookie sheet with a thin metal spatula, and transfer them to a cooling rack to fully cool off. You don't want to let them cool completely on the cookie sheet.
I think these cookies tasted best the first day and pretty good on the second day. Store in an airtight container.

Thursday, August 25, 2011

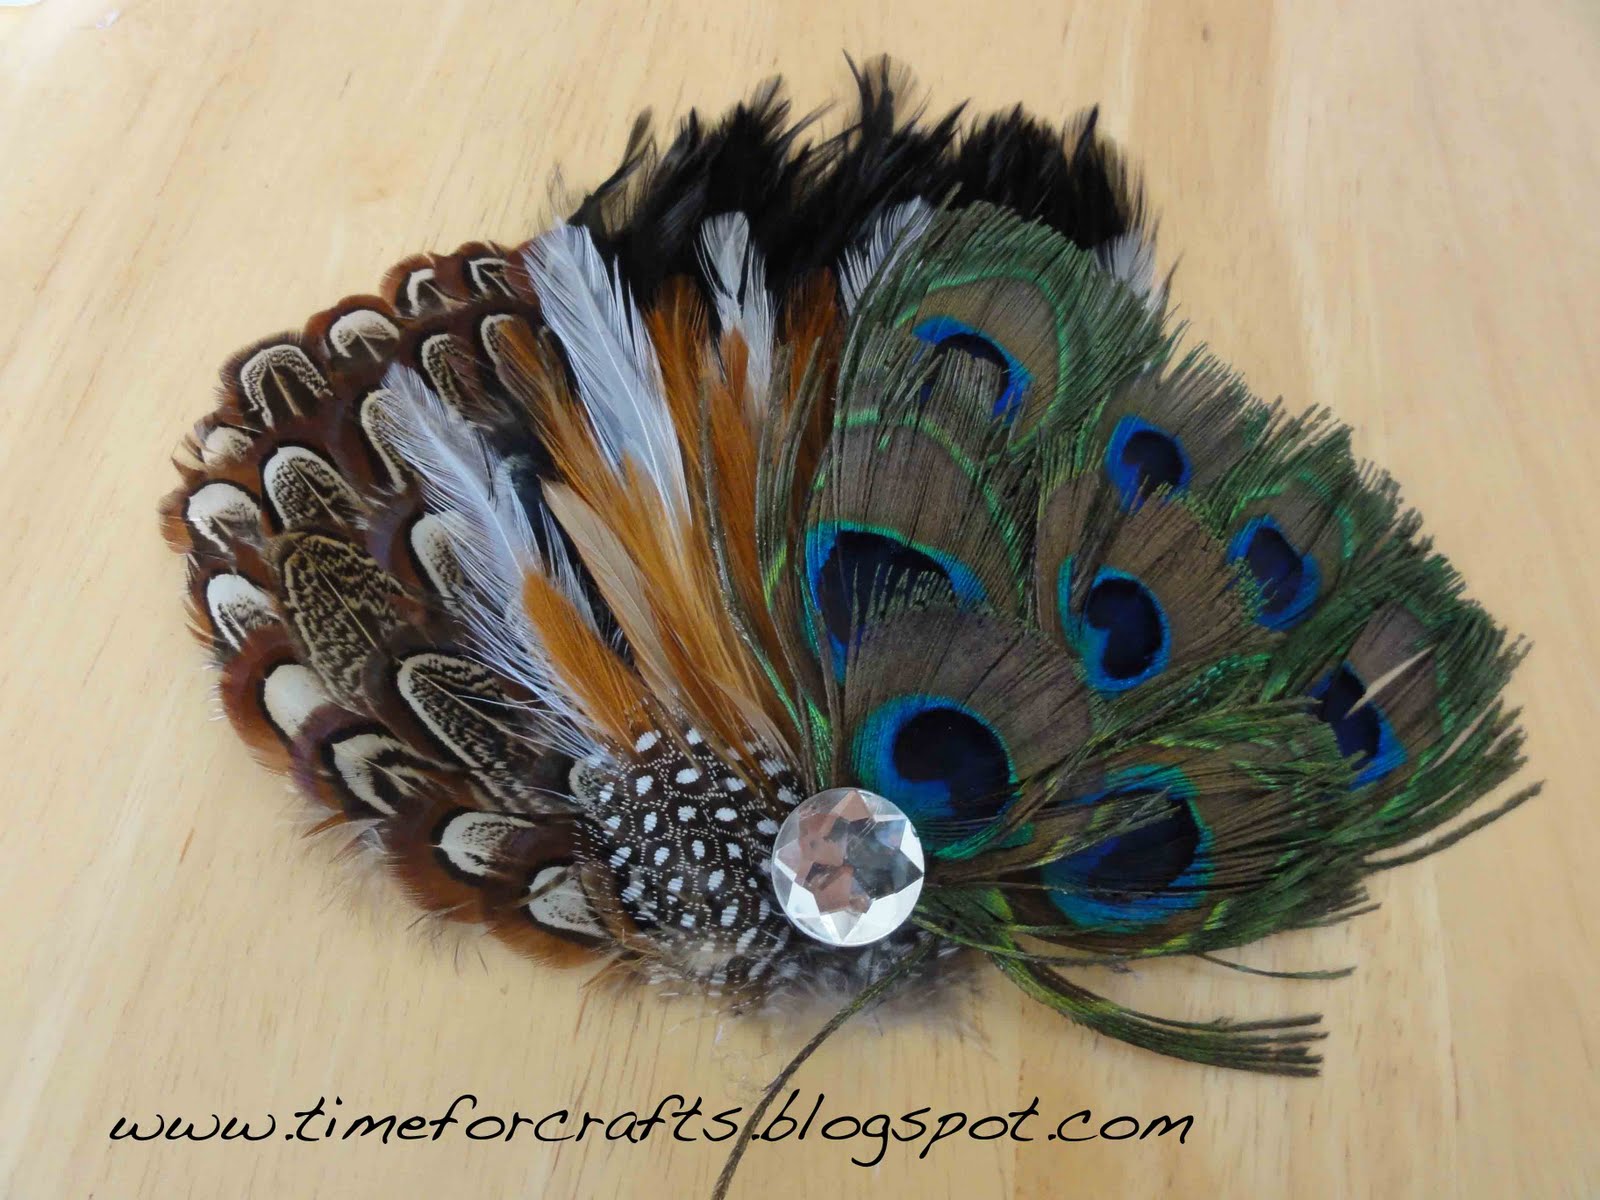
Peacock Feather Headband

Peacock feathers, or any feathers really... they are so chic and so popular right now! I wanted to make a headband for my darling daughter to wear (and it might find its way to my head one of these days...)

I went to the store and picked up this already assembled peacock feather pad at JoAnn's for around $4, and a black satin head band there as well for $2. I already had the black felt and I cut out two rectangles. Finally, I got a diamond as the accent for the headband... It took about 3 minutes to make this headband. The longest part was waiting for the hot glue gun to heat up!
The peacock feathers were already put together and attached to the felt pad. So all I had to do was attach it to the headband. You could use fabric glue and attach it directly to the headband. However, I didn't want to glue it directly onto the headband for two reasons...
  1. Since the feathers are so big, they will inevitably get smashed when the headband is placed on its side for storage, so I wanted to have the feathers removable... the feathers can be stored flat. Perfect!
  2. Plus, if the feathers are removable then the feathers can be attached to multiple headbands in a variety of colors and you don't need to have as many headbands in the same color. Love it!

Using the hot glue gun, I attached the two rectangle pieces of black felt. One at the bottom and one at the top of the pad. When I only had one rectangle piece of felt, it caused the feathers to poke up in a funny way on top of my daughters head so I attached a second one.
Here you can see both pieces of felt attached to the feathers.

I only put glue on the ends of the felt to create a pocket where the headband could pass through and be held onto the headband, but easily be slid off when you were done with it.
Here it is on the front side. I added a diamond at the bottom as an accent.
Here are some other feather pads that I picked up at JoAnn's. These were each around $3. Now she will have 3 fashionable headbands for only around $15. Nice!
Would also make a great gift for only $5-$6.


See how nicely they all stack on top of each other, which helps keep them straight and organized.

Tuesday, August 23, 2011

Chocolate Covered Fruit

Anything is better with chocolate! At least that's my philosophy. I like chocolate. A lot!

I had a bunch of leftover melted chocolate and fresh fruit in the fridge that needed to be eaten... so naturally I put the two together! Naturally! I made chocolate covered blueberries, grapes and kiwi.

For the blueberries... I lined a mini muffin pan with paper liners and then dropped 4-5 blueberries (that had been washed and thoroughly dried) into the liners.
Using a fork, load it up with melted chocolate, and just drizzle it over the top of the blueberries in no particular way. Leave the blueberries slightly exposed so you can see their pretty blue color. Add as much chocolate or as little chocolate as you would like.
You can use a fine drizzle from a fork and it will leave a design on the top of the chocolate. After you have covered them with the chocolate, let the chocolate set in a cool place or in the refrigerator. Best if served within a day of making them.

Chocolate covered grapes... Who knew right? For mother's day, my husband and kids got me some treats from a chocolate sweet shop. There were several sweet things that they brought me and among the treats included some chocolate covered grapes. I was a bit skeptical, but they are delicious. So I decided to make some myself.

Wash and dry your grapes. You want to make sure they are very dry because water and chocolate don't like each other very much! The water will cause the chocolate to seize up. Mmmmm... yummy red grapes!
Next, taking one grape at a time, drop it into the chocolate and using a fork, cover it will chocolate. Then pick up the grape on the fork and let the excess chocolate drip off. Then place the grape on a wax paper covered cookie sheet, until the chocolate is set.
Pick them up off of the wax paper and start popping them in your mouth. As the warm chocolate cools, it seems to shrink and condense on the grape so that when you bite into them, the grape bursts forth its juicy goodness. Sweet and crunchy and yummy! A great way to eat some dessert and fruit too!

Great as a gift too! Drop them into a bag, tie a ribbon on top and share with a friend.
Another fun treat. Trim the skin off of a kiwi... I cut them straight so that they were shaped octagonal, but you can make them circular if you want... or even in the shape of a star. After you have cut them about 1/2 inch to one inch thick, stick a popsicle stick inside them and push it up past the center of the kiwi so that it helps them to become more stable. (At this point you can proceed to the next step or you can freeze the fruit and dip in chocolate after.)
Then dip them in chocolate. A very important thing that I learned while making these... dab the kiwi on a paper towel first before you dip them in chocolate because they are very juicy. This helps to remove any liquid on the fruit, because as stated above, chocolate doesn't like water and as you can tell in the picture... the chocolate started to seize up and get clumpy on some of them.

Let the chocolate set up in the refrigerator and then take a bite. My kids enjoyed these... (I think kids enjoy anything on a stick!). Store in refrigerator and use within a day (unless you froze them and they will last longer).

Sunday, August 21, 2011

Cinnamon Roll Pancakes

Wow.... this breakfast was YUMMY! It is a very sweet treat for breakfast, so it won't be something you would make all the time, but definitely fun for a special occasion, maybe a birthday or Christmas?

Here is the full recipe....

{{Cinnamon Roll Pancakes}}

(printer friendly version)

PANCAKES:
1 cup
all-purpose flour

2 teaspoons
baking powder

1/2 teaspoon
salt

1 cup
milk

1 Tablespoon
canola oil

1 large
egg, lightly beaten

CINNAMON FILLING:
1/2 cup butter, melted
3/4 cup brown sugar, packed
1 Tablespoon ground cinnamon

CREAM CHEESE GLAZE:
4 Tablespoons butter
2 ounces cream cheese
3/4 cup powdered sugar
1/2 teaspoon vanilla extract

1. Prepare pancake batter: In a medium bowl, whisk together flour, baking powder and salt. Whisk in milk, oil and egg, just until batter is moistened (a few small lumps are fine).

2. In a medium bowl, mix butter, brown sugar and cinnamon. Scoop the filling into a small zip baggie and set aside. You don't want this to remain super-liquidy. It's best if it becomes a consistency similar to toothpaste (so let it set out for a bit or pop it in the fridge, but watch it so it doesn't get too stiff).

3. In a medium, microwave-safe bowl- heat butter and cream cheese until melted. Whisk together until smooth; whisk in powdered sugar and vanilla extract; set aside.

4. Heat large skillet over medium-low heat. Spray with nonstick spray. Scoop about 3/4 cup batter onto the skillet. Snip the corner of your baggie of filling and squeeze a spiral of the filling onto the top of the pancake. When bubbles begin to appear on the surface, flip carefully with a thin spatula, and cook until browned on the underside, 1 to 2 minutes more. Transfer to a baking sheet or platter and keep in a warm oven until ready to serve.

5. When ready to serve, spoon warmed glaze onto the top of each pancake.

Tips:

*Keep the heat low or your pancakes might cook up too quickly. Don't flip them until you see those bubbles starting to pop on top. Flip them with a wide spatula so you can grasp the whole thing without batter and filling dripping all over the place!

*It's best if you pour the batter onto your skillet, wait a minute or so and then swirl the cinnamon onto the batter. That'll give it a chance to set a little before you add the swirl.

*If your baggie of filling begins to get too thick, just pop it in the microwave for a few seconds to soften it up again. On that same note, it shouldn't be too runny. The consistency of soft toothpaste is perfect. If it's melty and runny, it will tend to run all over your pancakes. Once you micro it, let it sit on the counter at room temp for a while until it thickens slightly.


I doubled the recipe of pancake batter, but only made a single recipe of the cinnamon filling and the cream cheese syrup. The recipe suggest making HUGE pancakes that use 3/4 cups of batter. I found it much easier to make smaller pancakes and stacking up a few.

Here are the pancakes as the batter is bubbling up and I just added the cinnamon sugar filling in the swirly pattern.
The edges of the pancake will start to look dry and the bubbles stop forming. These are the signs to know when it is time to flip your pancake. You typically only flip your pancake one time. Use a spatula big enough to fit the entire pancake because it will flip easier and land nicely back on the griddle.

I cooked the pancakes on my griddle instead of a skillet. The surface is larger so I can make more than one pancake at a time, which is essential with more than one kid. Everyone wants to be first to get a pancake. The griddle recommends 400 degrees for pancakes, but I found that they cooked more evenly around 350 degrees. They don't cook as quickly, but when you flip them, the sugary filling won't burn as quickly either. See on that front pancake in the picture below... you can see the cinnamon filling spilling out a bit and cooking up a crusty layer on top of the pancake.

It takes about 1 or 2 minutes for the pancakes to cook through. Flip it off and place it on the place with the cinnamony swirl-ness on top. It is just pretty!
Then add another pancake on top of the one, and drizzle the cream cheese glaze on top. I didn't think much was required on top. It was so sweet and tasted like a cinnamon roll!

Mmmmmmm.....Yummy! Enjoy these yummy pancakes. It takes a little bit of time to prepare all three part of the pancakes, but once the prep work is done, it was easy to make the pancakes.

(recipe originally found on recipegirl.com)

LinkWithin

Related Posts Plugin for WordPress, Blogger...