Thursday, October 31, 2013

Caramel Apple Dipping Bar

Mmmmmmm.... Love Caramel Apples.
Love them!
They are the epitome of Halloween for me. I find that I crave them at least once every season.... if not more. My kids love them too.... especially now that they don't have their braces on anymore.

We've made lots of fully dipped apples and then covered them in yummy treats and toppings, but they can be such a pain to eat. This takes "most" of the mess away from eating a caramel apple and the best part of separating out the toppings, means that you can have lots of variety. Each apple slice can be it's own delicious caramel apple.

First I like to start with green apples.... the tartness of a green Granny Smith apple pairs nicely with the sweet caramel. Using a simple hand apple slicer that makes 8 even slices, I cut up the apples. Sometimes, I will cut each individual slice again to make a total of 16 slices per apple, especially if there are lots of peeps... (plus that means there is a greater caramel to apple ratio.... very important!) You can use skewers to pierce the apple before dipping or just use your fingers.


Here are the few toppings that we used this time. Sprinkles, mini chocolate chips, peanuts, macadamia nuts, and chopped up M&M's.

Other topping ideas are:
  • shredded coconut, 
  • mini marshmallows (can be cut in half so they aren't so unruly), 
  • chopped up candy bars (Nestle Cunch, Kit Kat, Twix, Snickers, Milky Way, etc.), 
  • crushed up Oreo cookies, 
  • crushed up chocolate chip cookies, 
  • other nuts (walnuts, pecans, almonds, etc.), 
  • toffee bits, 
  • candy corn, 
  • cereals (Cinnamon Toast Crunch, Trix, Lucky Charms, Fruit Loops- kids love these bright sugary cereals),  
  • really just wander around the grocery store and you will find a gazillion things that you can add to this caramel apple dipping bar. 
Since there were only a few toppings and only my few kids, we put them in piles on a plate... but you could put each individual topping into its own bowl.

The caramel recipe I used is available if you click here. Another quick and easy way to make a caramel for apples is to unwrap KRAFT caramels and put them in a saucepan over medium heat (or you can melt them in a microwave) with a small amount of milk or cream. I would say for a full bag of caramels you would add about a tablespoon or two of cream.


So many choices... so many varieties... so many yummy choices. 

Happy Halloween!

Tuesday, October 29, 2013

Trick Or Treating Buckets

These are our Trick or Treat Buckets.


I made these a few years ago and they have been fantastic, so I wanted to share. Here's what I did:
  • I took some clean, brand new, empty gallon paint cans and decorated them. I used a white wrapping paper to cover the paint can first. The paint can is about 7 1/2 inches tall and it is pretty long (21 inches), so the wrapping paper enabled it to be only one piece of paper that wrapped around the can. If you want to piece paper then you could use any size or type of paper. 
  • I attached the paper to the can using Stampin' Up Sticky Strip cause it is super strong and holds everything together so very well. 
  • Before attaching the paper, I stamped some pumpkins to the bottom edge of the paper. You could use stickers or other images to embellish the can. 
  • I made some words that said TRICK or TREAT, backed them with some cardstock and then attached them to the can with the sticky strip. 
  • I used the sticky strip again to add a strip of 3/16" grosgrain ribbon at the top edge. 
  • The paint can handle was a little sharp on the kids little hands, so we added some large wooden beads that would fit over the handle. It really helps to make it easy to carry the bucket around, even when it is loaded full of candy. 
  • You can also decorate a coordinating paint lid (not pictured). 
***Now I have to let you in on the best part of these cans... after all the candy has been collected in these adorable paint cans... you can pound the lid on top and it makes it much harder for the little kiddos to sneak their candy away. You can leave their cute little buckets out for decoration and then pop them open when you're ready to enjoy a treat.


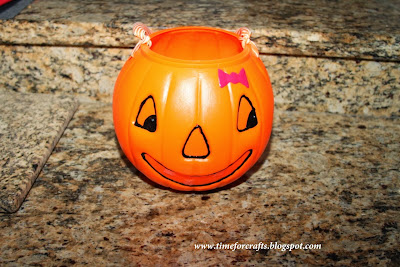
This year I had this blank plastic pumpkin that had paper eyes and mouth. It was the cheap kind you get at the store. We decided to spruce it up a bit. I took off all the paper decorations for the eyes and then we drew in the outline of eyes, nose and mouth with some black puffy paints. Then we added some sparkles to the eyes, some white sparkly teeth and a pink bow to the cute little pumpkin's face.

And of course when you are three... you always want your name on everything, so we added it to the back. I took off the plastic handle that the pumpkin came with and added some large grosgrain ribbon. Then it was ready for her to use to collect all her valuable candy loot.


Monday, October 28, 2013

Pumpkin Candle Gift


This super sweet gift is perfect for this time of year. Use as a visiting teaching gift and add a lesson to go with it. Teach about how important it is to be a Christian and how much our Heavenly Father loves us. Or give as a neighbor gift/teacher gift. Everyone loves to receive a sweet smelling candle. And any gift is better when there is a sweet thought behind it. One that makes us feel better about who we are.

Here's a close up of the quote.

Here's the printable... Click on the image and then save it. Print it out on a 8 1/2 by 11 sheet of paper and cut it up. Embellish it with a pumpkin sticker or something. You can laminate it and add a magnet to the back so that the recipient of the gift can remember the saying by putting it on their fridge or magnet board.

Add the candle into a cellophane bag, add the magnet quote and tie up the gift with a ribbon.

Sunday, October 27, 2013

Witch Hat Cookie Treats

I brought a birthday treat for the month of October. They are these super easy and super yummy witch hats.

Here's what you need:
Keebler Shortbread Cookies (you know the flat striped ones)
Hershey Kisses
Can of Vanilla Frosting, tinted orange with gel paste

The base of the hat is a Keebler Shortbread cookie flipped over. Then I had store bought frosting that I colored orange and put into a ziploc bag and cut the tip off. I piped a small amount of frosting onto the bottom of an unwrapped chocolate kiss and then stuck it on the cookie. After all the kisses were attached I used the ziploc piping bag to add a cute little bow to the hat.

That’s it!

It took like 10 or 15 minutes to make about 40 of them. From start to finish. I was concerned about the top of the hat (the kiss) slipping & sliding around on the soft canned frosting. I made these last night and by this morning, they were perfect. The frosting had solidified so that it held everything in place and I could easily stack them on the plate. But when you tried to eat it, it was still soft and delicious!

Friday, October 25, 2013

Flying Monkeys- New Free Halloween Printable

Made another printable. Wanted to share. Halloween is getting close. We're counting down the days here til the candy festival begins.

I've had a bit of theme lately... they all seem to revolve around the Wicked Witch. I think she's adorable. These should be able to print out at 16x20... that's what I created them for or any related size down such as an 8x10 or 4x6.


Monday, October 21, 2013

Halloween Candy Coma Bark

Just like it says in the name… this bark is candy coma goodness. You might have to call the dentist and set up an appointment before you eat this, cuz you’ll probably get a cavity just from looking at all this sweetness. At least I will.  


It kinda includes everything that says Halloween and for sure everything that says YUM! I don’t have exact measurements on how much of each ingredient was used. I bought bag fulls of everything and then just eyeballed it from there. (I was able to make 2 big trays of the bark with some leftover candy, cookies, nuts & pretzels. You can add as little or as much as you want.) Here’s the list of ingredients needed:
  • Oreo Cookies (more festive with the orange cream, but they were gone when I went to buy everything so I just got white cream.)
  • Pretzel sticks, broken in half-ish
  • Roasted Peanuts
  • Peanut M&M’s (or plain if you want)
  • Reese’s Pieces
  • Chocolate Chips
  • Candy Corn (I used the caramel candy corn because that was all that was left when I went to buy the stuff… it’s only four more days to Halloween and the regular kind was all gone. I would typically use the regular one, but the caramel one worked just fine… it gave the candy that chewy goodness.)
  • Halloween colored sprinkles or nonpareils candy.
  • Almond Bark (or white chocolate chips)
Here are the steps to making the candy bark....


  1.  I mixed all the ingredients in a bowl except for the sprinkles & almond bark. I melted the almond bark. On a large cookie sheet I lined it with parchment paper (could use waxed paper). Then I spread a thin layer of chocolate on the paper to begin binding everything together.
  2. I sprinkled a layer of the candy/pretzel/nut mix onto the melted chocolate layer. Try not to make this layer tooo thick because when you break it all apart later, pieces will fall out, but it is the best part so don’t skimp. A nice moderate layer. =)
  3. Now take the rest of the almond bark and drizzle it over the middle candy layer.
  4. Sprinkle some more of the candy on top to make it look pretty, and finally sprinkle the nonpareils candy on top for an extra pop of color.
  5. Put the candy in the refrigerator to help the chocolate set faster. When it has fully hardened (after about 30 minutes to an hour), pull it out and break the candy into pieces.
  6. Put the candy into cellophane bags and tie it off with some cute ribbon. Done!
The whole process took a little over an hour, because of the cooling time. I took this candy to 2 different activities and both times… everyone was raving! Delish!

It can also be packaged up to give away in a small cellophane with some ribbon.

Wednesday, October 16, 2013

Chocolate Chip Pumpkin Bread--- Super Fancy!

Fall is here and this is a good way to enjoy it! Chocolate Chip Pumpkin Bread. But let's not just do it the plain old fashioned way... let's do it in a better way.


Here it is... a better way to eat Pumpkin Bread. You might say, how can there be a better way to eat pumpkin bread. It is pretty much Fall Perfection in a Loaf Pan. Right? However... a way has been found. Cover it up with chocolate. True, it's already filled up with some chocolate chips, and then it just gets better with a little more chocolate on top. I made about 8 loaves (mini loaf pans) of this the other day. I gave away about 4 of them. The rest were devoured by my kids. They loved it! You must try it! You must make some! Must!!


Without further ado... Here's the recipe:


{{Chocolate Chip Pumpkin Bread}}


¾ cup sugar
¾ cup brown sugar
2 eggs
½ cup unsweetened applesauce
1 cup pumpkin
1 teaspoon baking soda
1 teaspoon cinnamon
½ teaspoon salt
½  teaspoon nutmeg
¼ tsp allspice
¼ tsp ground cloves
1 ¾ cups flour
⅓ cup milk
1 cup miniature chocolate chips
½ cup chocolate chips
¼ cup white chocolate chips
1 ½ teaspoons shortening

In a mixing bowl beat the sugars, and eggs until creamy. Add the applesauce and pumpkin then beat again. Sift together the baking soda, cinnamon, salt, nutmeg, allspice, cloves, and flour. Add to the pumpkin mixture alternately with the milk. Stir in the mini chocolate chips by hand.
Spread the batter in a greased 9x5 loaf pan. Bake at 350* for 60-70 minutes. Cool in the pan for 15 minutes, then flip out onto a wire rack to cool completely.
Place the chocolate chips and 1 teaspoon shortening in a microwave safe bowl. Heat for 30 seconds. Stir and heat again for 15-20 seconds. Set aside and repeat with the white chips and remaining shortening. Spoon the melted white chips into a plastic baggie with one tip cut off.
Spoon the melted chocolate chips on the top of the bread. Go to the edge, but be careful to not push the chocolate over. Immediately drizzle the white chocolate from side to side. Use a toothpick to draw lines from end to end. Work quickly before the chocolate sets up. Makes 1 loaf.

(Makes 4 small loaf pans with this recipe. Add a little over a cup of batter per pan. Cook for about 35-40 minutes. These are the perfect size for giving away a small treat to your friends. You'll want to share. It's just that good!) Wrap it up in a cellophane bag and tie it up with some fall ribbons & twine. This would be a great neighbor gift for Christmas too. Tie a tag on with the recipe and share this yummy-ness.


Now that you have the recipe... just a few more notes. 
It's not just fancy and pretty... it's DELICIOUS too and with no oil in it... you could almost call it healthy.  I found it here originally and then changed up the recipe a bit. More spices, less oil.

I have made this recipe with less chocolate chips inside the bread and it still turns out good. So if you think that it will be TOOOOO chocolatey (I'm not even sure I know what that is, but some people feel this way!) then you can reduce the mini chocolate chips to about 1/2 cup - 3/4 cup instead.  You can tell there is a little bit less chocolate chip goodness in this loaf of bread, but it is still delicious. So much yummy flavor filling up the pumpkin and spices. With less chocolate, the nutmeg and cinnamon can really shine.


When making the design on top... you want to work quickly and keep the chocolate warm and melty so that when you put the white drizzle on top it will melt into it and become one layer of chocolateness. You can cut a tiny hole in the ziploc/pastry bag filled white chocolate for a smaller more intricate design...

Or you can cut a bigger hole in the bag and pipe more chocolate on top for a bolder look.


See the difference... But it's gonna be yummy either way that you do it.


Happy Fall Y'all! Love it. It truly feels like Fall has begun with this spicy pumpkin smell in the air and that cool crisp feeling outside. The leaves are changing and it's so much fun. Yum!

Tuesday, October 15, 2013

Halloween Chalkboard

Here's the framed chalkboard that I have in my kitchen. I think chalkboards are so cute. I love all the styles and designs and sayings that I keep seeing. Here's a bunch of ideas for chalkboards.

I've been changing the quote and pictures to inspire the kids and for the holidays.

Here's what I did to make it...

I took a large, white frame that I bought at IKEA.
It is the Virserum Frame that measures 11 ¾x15 ¾".

Next I bought the Chalkboard Contact Paper. It is available on Amazon


I took this and covered the wood backing board that came inside the frame. I measure the size that I needed and the pulled off the white grid paper and applied the contact paper. It's kinda like putting vinyl on things... especially when using a large piece. Start in one area and move out slowly to prevent bubbles.

You could also cover the glass if you wanted to, or something else so that you have something to fit inside the frame. The board was right there in the frame, so I used just that and it will make it easy to still use this as a frame if I decide I want to use the mat board and glass at some future point.

Then I reassembled the frame and it was ready to decorate.

I used this chalkboard paint pen from Stampin' Up. These work so well. They go on more smoothly than actual chalk and it is bolder look. Plus if you make a mistake... you just wipe it off with some water and start again.You can buy this pen by clicking here...


Ta Dah! It was done.


Here's another design I did previously.

It's been fun playing around with this framed chalkboard!

Monday, October 14, 2013

Healthy-ish Halloween After School Snacks!

In our house.... We love Halloween! And it is even more fun when you can make fun food to help celebrate. 

These "Apple Smiles" or "Monster Mouths" have been a tradition for our family since I was a kid.  They bring back so many memories and my kids love them as much as I did when I was their age. Delish! That little bit of marshmallow sweetness paired up with an already great duo- apples & peanut butter. Slice up your apples, slather on some peanut butter, line up your mini marshmallow teeth and slap the top lip on top of the teeth and then take a great big bite in. They are yummy!

These next two were new additions this year.... but both of them are definitely keepers! First we have some Witch's Brooms! I took a String Cheese stick and cut it up into thirds. I started to pull apart one end of the cheese stick to make it look like the bristles of a broom. Use a small sharp knife to help separate the ends. Then take a pretzel stick and push it in the other end of the cheese that isn't separated. Sometimes the cheese would split a bit at the top so it helped to take a small piece of chive and tie it in a knot (plus it makes them look more realistic!). Done! You can make a bunch of these in only a few more minutes.

Here's the second keeper! Used Band-Aids! Ahhhhhh! Don't you love them!? I LOOOOOVE them! And they're soooooo very simple. These obviously aren't as healthy as some of previous ones, but who cares when they are this cute. Break apart the graham crackers into four pieces and lay them out on your serving dish. Use some white frosting and spread it onto the middle third section of the cracker. (I used a small ziploc bag, put the frosting in, and cut the snip off the end of the bag so you can start squeezing the frosting out onto the cracker). The add some blood by adding some red frosting. You can dye some of the white frosting red or just buy a pre-made red gel frosting and put that on. (Plus the gel would look a bit more realistic.)

Ta dah! Kids ate these after school and they were so happy! A great and easy after school snack. 

Sunday, October 6, 2013

Snap Doodle... Breakfast Ready in a SNAP!

This is one of the yummiest breakfasts. Warning! It isn't healthy, but boy is it yummy and slightly addicting. But what do you expect when you cut up a cube of butter and put it all over the top! There's brown sugar and cinnamon sprinkled all over the top of the batter and then when you add the butter on top, there are these deep crevices of yumminess that appear.... they are almost a little bit of heaven on your breakfast plate!


This is how it looks when it come out of the oven. Mmmm... it looks so good. Let's talk about how to make it.


First... here's the recipe....
{{Snap Doodle}}

Printer friendly version... click here

1 egg
½ c. white sugar
1 c. milk
2 c. flour (1 cup all purpose flour, 1 cup whole wheat flour)
1 T. baking powder
pinch of salt
½ c. brown sugar
cinnamon
6 T. Butter


Break egg in bowl; beat slightly. Add white sugar and stir then add milk all at once. Sift together flour, baking powder and salt and then add to the liquid mixture. Pour into a greased 7½ x 12-inch pan. Sprinkle brown sugar over the batter and then sprinkle cinnamon on top. Cut butter into pieces and drop on top of the brown sugar and cinnamon. Bake at 350 degrees for 30 minutes. (Bake at 325 if you are using a glass pan.) Allow to cool for a few minutes, and then serve with cold milk. Yield: 6 servings.

First you make the batter.... Basically you will mix together the first 6 ingredients. Put that batter into a greased pan... here I am using an 8x10 pan and I've doubled the recipe. But it will look the same even in a smaller pan... The recipe calls for a 7 1/2 by 12 inch pan... If I'm making only a single recipe I will just use a 8x8 pan.


This is where the fun begins. After the batter is in the pan, you sprinkle brown sugar all over the top of it. I don't even measure this anymore. The recipe calls for a 1/2 cup... I probably use a bit more than that. Put a nice layer of brown sugar over the top of the batter.


Next comes the cinnamon. Again I don't measure this anymore, I open up the cinnamon and sprinkle a nice contrasting layer on top of the sugar.


See... a nice light and dark contrast. But it only gets better, one more layer to go. The butter layer.


This is how I like to do it. Take a softened cube of butter (again this is for a double batch, only 6 Tablespoons for a single bath). Cut the butter up into little pats. I like to cut it in half, then in half again.
Then I take each piece and cut them again into little pats.


Now you randomly sprinkle the pieces of butter all over the top, taking care to poke a few of them into the sugar and batter.


Cause when you push the butter in, ... these are the types of amazing-ness that will develop. It seems to be random where and how these crevices take shape, but they are the coveted pieces.  

Here's a close up of some of the trenches of Terrific Gooey-ness. It is a buttery, sugary pool of sweetness that tastes so good next to the bread that carries the manna of sugariness to your mouth.


Mmmmmm.... Mmmmmmmm... GOOD!


This is usually how we like to eat our Snap Doodle! A warm, gooey slice of snap doodle... a tall glass of cold milk, and some fresh fruit on the side. Perfect!
 
It's basically a coffee cake so you could enjoy it any time of day, but it is a great way to start off your day.

LinkWithin

Related Posts Plugin for WordPress, Blogger...