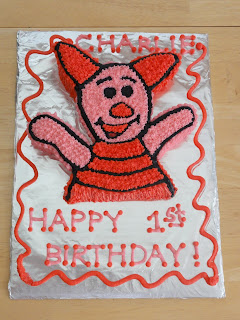
I made this piglet cake for my niece's first Birthday party. It is her smash cake.
First I made two cakes in 8x8 cake pans from this Chocolate Crazy Cake recipe. It is a waaaaay yummy and moist chocolate cake! It has never NOT turned out. Mmmmm.... Plus it is a good recipe to keep on file because it doesn't require eggs or milk. It is FABULOUS and of course CRAZY!
{{Crazy Cake}}
3 cups flour
6 tablespoons Cocoa
2 teaspoons baking soda
2 cups sugar
1 teaspoon salt
2/3 cup oil
2 teaspoons vanilla
2 teaspoons vinegar
2 cups water
Pour oil, vanilla and vinegar each into a separate hole. Then pour the water over and beat together until almost smooth. Pour batter into a prepared pan and bake in oven for 30 minutes or until tested done.
While the cake was baking, I cut out a piece of paper that measured 8x8 (since that was the size of pan that the cake was baking in). On that piece of paper I drew a rough draft of a Piglet. As simple as I could and labeled the colors that would be piped onto the cake (black for outlines, light pink, dark pink and a little teeny tiny bit of red on the tongue).

At first I thought I would just pipe the outline on the cake and leave the whole cake to be a full square, but decided instead to cut up the cake into the shape of piglet and cut him out of the cake for a more 3-D effect.

I simply laid the paper on the cake, and cut around it. I had two cakes that I was going to layer on top of each other, but decided that it would be too much cake for a sweet little one year old and just made the cake one layer, and I didn't even torte it or fill it. Simple, sweet, chocolate cake.
{{Buttercream Icing}}
1/2 cup solid vegetable shortening
1/2 cup (1 stick) butter or margarine softened
1 teaspoon clear vanilla extract
4 cups sifted confectioners' sugar (approximately 1 lb.)
2 tablespoons milk
In a large bowl, cream shortening and butter with electric mixer. Add vanilla. Gradually add sugar, one cup at a time, beating well on medium speed. Scrape sides and bottom of bowl often. When all of the sugar has been mixed in, icing will appear dry. Add milk and beat at medium speed until light and fluffy. Keep bowl covered with a damp cloth until ready to use. (Yield: 3 cups of icing)
I doubled this recipe. I'm always nervous that I won't have enough frosting. So I made extra... there's always something to use frosting on... graham crackers, kids fingers love when it is piped on there, another cake, cupcakes, etc.
First I made a small amount black (about 1/2 cup) using the Wilton black icing color.
I covered a rectangle cake board with aluminum foil taped in place on the back. Placed the cake on top and then filled a pastry bag with the black frosting and topped it with Decorating Round tip #5. Using the drawing as a guide, I piped on the outline of the Piglet.

I put the cake back in the freezer to firm up the outline. Meanwhile, I took the pink decorator icing color and made the rest of the icing light pink.
I pulled out about 1 1/2 cups of frosting out and added more of the pink color to make it a dark pink.
Finally, I pulled out a teeny tiny bit of the dark pink and made it red using Real Red icing color.
I took that teeny tiny bit of red and put it into place on the tongue of the Piglet. Then it was time to start piping.... I used a small star tip (#13)for the pink frostings. I started with the light pink and slowly started to fill the areas. It was a slow process since I had chosen to use such a small tip. After filling the light pink areas on top, it was time to start filling the dark pink areas. Next it was time to fill the sides. Continuing with the color that was on top, I switched the tip to a larger star (tip #18) and made a zig zag motion up and down the side of the cake.
 Finally using Round Tip #5 and the light pink frosting, I put the name and Birthday information. Then switching to dark pink frosting, I added dots to all of the letters, and added a squiggle line around the Piglet cake.

Then the cake was done! Ta Dah!


No comments:
Post a Comment